
Imei’s, “Damn, You Made This?” Gluten Free Bread
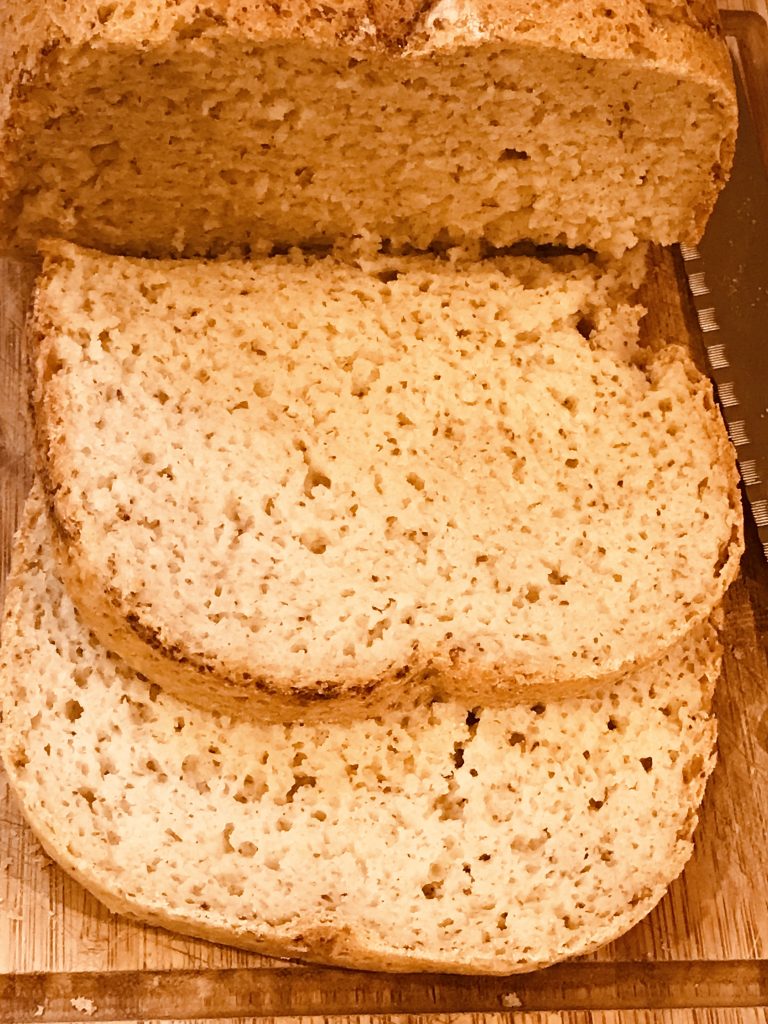
Have you dreamed of gluten free bread that acts, tastes, smells, and delivers like real bread? After five years of experimenting, tah-dah! Photo by Imei Hsu.
“Why do you do this to yourself?” my husband said when he walked in on me while I stared at the television screen. Paul and Mary on Collection 3 Season 5 of The Great British Baking Show” had just announced the Technical Baking Challenge to a group of eight remaining amateur bakers: twelve pita breads made from a gluten-free flour and a packet of a mysterious powder labeled, “Psyllium Husk.” I was intrigued.
Ever since my diagnoses of Celiac Disease, I have chased the elusive dream of having a loaf of gluten-free dairy free bread that acted like bread, tasted like bread, and smelled like bread, only not made of yucky chemicals and ingredients that turned my insides out, or made me stick out my tongue whilst yelling, “Yuck!”
Nearly every baking experiment I have tried ended up tasting funny, turning out more like a flatbread with no lightness, or lasting only a few hours before it turned into a rock-hard block destined for the rubbish bin. “What a waste,” I would mutter to myself as I heard the faux bread land with a thump at the bottom of the trash. When you can’t have wheat, oats, dairy, or certain flours to lend towards a lighter bake, the science of baking always wins, and the gluten-free eater loses. You need one of two things: Xanthan gum or Psyllium husk. And at the time, Xanthan gum was a no-go for me, and I wouldn’t discover baking with psyllium husk until 2017.
Watching these amateur bakers struggling with their gloppy, gooey, unfamiliar doughy disasters gave me a sadistic pleasure. It’s totally hard to make good gluten free bread. Even Tom Gimmel, Panera Bread‘s baker, was loathe to create a gluten- free bread for the Panera brand. He named everything that makes gluten-free bread substandard and miserable for people who love making bread. The mouthfeel is all sorts of wrong, the texture is not light, and all the weird ingredients and chemicals found in most commercial GF breads are just horribly off-putting. I don’t blame him one bit that he resisted making a GF bread for Panera, and in the end, they ended up calling it “gluten conscious”, whatever that means! Why would he want to put his name to it?And why then would anyone needing a truly gluten free bread eat it?
But I digress. My point is that making gluten free bread that tastes good and won’t kill you is not easy, and perhaps it’s best to leave it to people who are passionate about making gluten free food. Full stop.
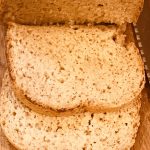
Since I’m all about eating real food and real ingredients, the idea of making a real-ingredient bread seemed like something I could someday make for myself, but it wouldn’t necessarily be something I expected anyone else to want to eat. But after five years of experimenting, I knew I was getting closer to something when I put two and two together, reducing the Xanthan gum and replacing what was missing with psyllium husk. The result was a fluffy bread that held up well without toasting, and stayed fresh and light after Day 1, Day 2, and even Day 3.
I named it, Imei’s ‘Damn You Made This?’ Gluten Free Bread” because I know people will ask me if I made this bread or if it is store bought. It is THAT good and good looking. The great thing about making your own bread is that you can swap out flours with just a little guidance on the ratios, and you control how much, if any, Xanthan gum to psyllium powder you want to use, while simultaneously limiting the amount of sugar, a source of gut irritation for most people with autoimmune disease and immune-related illnesses. I have used Psyllium powder as a fiber ingredient added to sauces and chicken pot pie filling, and it works perfectly to create a lovely emulsion without becoming a goopy.
There is, however, no substitute for activated dry yeast, as this provides the rise necessary to make the dough turn into a bread rather than to remain a flatbread in nature. Therefore, if you are on a restricted diet to treat conditions like SIBO and Candiasis, you should avoid foods with yeast, so no bread for you until your gut is cleaned out. Period. If you want to argue with me on this, I will refer you to every MD and naturopath worth his or her salt.
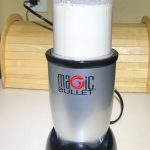
Make your own alternative milk by soaking or mixing your source food with water in a blender. Photo by Imei Hsu.
A note on alternative milk: if you are vegan, or you can’t have cow’s milk, lots of bread recipes call for using an alternative milk as a substitute. I enjoy full fat coconut milk and adding water to it, but some people are going to balk at that and say, “Why not just buy boxed soy, almond, or rice milk?” That’s certainly a choice, but if you are one of those people who are sensitive to emulsifiers, most of these boxed milks have guar gum, carrageenan, and/or Xanthan gum added. Instead, try making your own alternative milk from brown rice or white rice, coconut milk solids, or almond milk.
The result of this easily-customizable bread is a light texture with a complete bake* (nothing doughy), enough elasticity to hold up to dipping the bread in olive oil and vinegar as an appetizer, spreading with cauliflower hummus, and even sopping up some soup or stew — it’s that hearty and robust! It’s crispy with a light toasting, and the sound of it while biting in made me cry with joy. Now, I can have bread and sunnyside up eggs with a side of beets for breakfast.
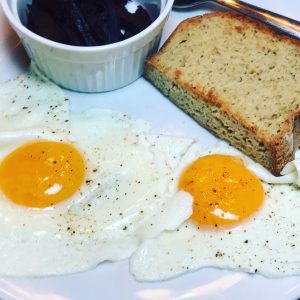
GF Bread, eggs, beets or some leafy greens makes a fun breakfast. Photo by Imei Hsu.
*A note: when I say “complete bake”, this is a reference to using a standard bread machine. A 3.5 hour setting for a 1-1/2 pound dark crust bread using gluten free flours are likely to produce a baked loaf that could use just a little while longer on the bake for perfection. Why does that happen? Well, the standard bread machine wasn’t made for gluten-free flours, has two rise cycles, and a bake time adequate for wheat flour. A gluten-free flour needs a lengthy mix cycle, a single rise or proving cycle, and a longer bake cycle for the perfect GF bake. You may find you want to either finish the loaf in the oven, toast individual slices for extra crisp, or search for a bread machine with a magic gluten-free setting.
If you make this bread, please feel free to Pin it to Pinterest, and share with others.
Imei’s “Damn, You Made This?” Gluten Free Bread
- Prep Time: 20 mins
- Cook Time: 3.5 hours
- Total Time: 22 minute
- Yield: 1.5 pound loaf 1x
Description
Inspired by Alison’s Gluten Free Bread on Allrecipes.com, I have considered her proportions, which are similar to almost every other GF bread recipe I have seen, and then I have made five changes to make this bread nut free, bean free, dairy, free, lower sugar, and have the least amount of Xanthan gum (from none to 1/2 the amount called for).
For this recipe, I use a bread maker that has a setting for a Basic Crust 1.5 pound loaf. You can make this bread by hand if you are willing to proof it a least once, and knead it until your arms are crying. Since I have an autoimmune disease and energy is a concern, I like throwing the ingredients in a bread maker, turning it on, and falling asleep with a blanket and a warm, purring cat. Three and half hours later, everyone and your neighbor will invite themselves over for bread, and you can pretend you slaved all day over it.
Ingredients
1 egg* (or chia seed egg)
About 1/3 of the whites of an additional egg (or 1/3 chia seed egg and a pinch psyllium husk)
1 Tablespoon apple cider vinegar
1/4 cup grapeseed or canola oil
1/4 cup (or less) brown rice syrup (honey if you can’t have brown rice)
1 cup full-fat coconut milk + 1/2 cup water, mixed, and warmed
1/2 Tablespoon to 1 Tablespoon Xanthan gum (replace with Psyllium husk + water, 1:2 ratio)
1/2 cup Tapioca flour
1/4 cup flaxseed flour or millet flour
1/4 cup sorghum flour
1 cup rice flour
1 cup brown rice flour
1 Tablespoon activated dry yeast (plus a tablespoon of warm water and a pinch of sugar)
Instructions
Refer to your bread machine’s instructions on the order of ingredients. If you don’t have any instructions, place the dry ingredients in the bottom of the bread machine container, then make a small well in the center.
Depending on your preference, add psyllium husk and/or Xanthan gum. Both lend lightness and elasticity to gluten free flour, but Xanthan does do this more effectively than psyllium husk. If you can tolerate small amounts of Xanthan gum, consider a half-half split, and add another 1/2 teaspoon of psyllium husk (1:2 ratio).
Add wet ingredients in the flour well. Mix the activated dry yeast with a tablespoon of warm water and a pinch of sugar in a separate mixing bowl, and pour it into the bread machine as the last step.
Select the bake time and crust you prefer (for this recipe, Basic Crust 1.5 pound loaf with a 3.5 hour cycle (proof, mix, proof, spin, bake) is a safe bet for most bread machines. When the bread cycle begins a slow spin (five minutes in), observe the dough for dryness or wetness. If too wet, add more tapioca flour or a small amount of flaxseed flour (makes the color darker); if too dry, add more coconut or the alternative milk of your choice.
After it completes the kneading cycle and goes to the bake cycle, the bread should look like it is rising (about half way up the bread container). If it fails to rise, one of three things may be true: the yeast is not activated (old, expired), not enough sugar was added (it needs to feed on the sugar), or in some cases, you live in an area of the world where the elevation is affecting the rise (this is a thing).
When the bake is finished, let the loaf cool for at least ten minutes until the bread easily slides out from the container. Remove the bread machine’s paddle, which may have become embedded in the bottom of the loaf. Using a serrated-edged knife, slice evenly for toast, or leave as a loaf and store in a large parchment paper bag. It should stay fresh for up to three days without refrigeration.
- Category: Bread
- Method: Bread machine
Keywords: gluten free, bread, dairy free
