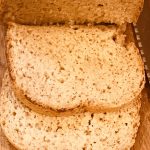
Description
Inspired by Alison’s Gluten Free Bread on Allrecipes.com, I have considered her proportions, which are similar to almost every other GF bread recipe I have seen, and then I have made five changes to make this bread nut free, bean free, dairy, free, lower sugar, and have the least amount of Xanthan gum (from none to 1/2 the amount called for).
For this recipe, I use a bread maker that has a setting for a Basic Crust 1.5 pound loaf. You can make this bread by hand if you are willing to proof it a least once, and knead it until your arms are crying. Since I have an autoimmune disease and energy is a concern, I like throwing the ingredients in a bread maker, turning it on, and falling asleep with a blanket and a warm, purring cat. Three and half hours later, everyone and your neighbor will invite themselves over for bread, and you can pretend you slaved all day over it.
Ingredients
1 egg* (or chia seed egg)
About 1/3 of the whites of an additional egg (or 1/3 chia seed egg and a pinch psyllium husk)
1 Tablespoon apple cider vinegar
1/4 cup grapeseed or canola oil
1/4 cup (or less) brown rice syrup (honey if you can’t have brown rice)
1 cup full-fat coconut milk + 1/2 cup water, mixed, and warmed
1/2 Tablespoon to 1 Tablespoon Xanthan gum (replace with Psyllium husk + water, 1:2 ratio)
1/2 cup Tapioca flour
1/4 cup flaxseed flour or millet flour
1/4 cup sorghum flour
1 cup rice flour
1 cup brown rice flour
1 Tablespoon activated dry yeast (plus a tablespoon of warm water and a pinch of sugar)
Instructions
Refer to your bread machine’s instructions on the order of ingredients. If you don’t have any instructions, place the dry ingredients in the bottom of the bread machine container, then make a small well in the center.
Depending on your preference, add psyllium husk and/or Xanthan gum. Both lend lightness and elasticity to gluten free flour, but Xanthan does do this more effectively than psyllium husk. If you can tolerate small amounts of Xanthan gum, consider a half-half split, and add another 1/2 teaspoon of psyllium husk (1:2 ratio).
Add wet ingredients in the flour well. Mix the activated dry yeast with a tablespoon of warm water and a pinch of sugar in a separate mixing bowl, and pour it into the bread machine as the last step.
Select the bake time and crust you prefer (for this recipe, Basic Crust 1.5 pound loaf with a 3.5 hour cycle (proof, mix, proof, spin, bake) is a safe bet for most bread machines. When the bread cycle begins a slow spin (five minutes in), observe the dough for dryness or wetness. If too wet, add more tapioca flour or a small amount of flaxseed flour (makes the color darker); if too dry, add more coconut or the alternative milk of your choice.
After it completes the kneading cycle and goes to the bake cycle, the bread should look like it is rising (about half way up the bread container). If it fails to rise, one of three things may be true: the yeast is not activated (old, expired), not enough sugar was added (it needs to feed on the sugar), or in some cases, you live in an area of the world where the elevation is affecting the rise (this is a thing).
When the bake is finished, let the loaf cool for at least ten minutes until the bread easily slides out from the container. Remove the bread machine’s paddle, which may have become embedded in the bottom of the loaf. Using a serrated-edged knife, slice evenly for toast, or leave as a loaf and store in a large parchment paper bag. It should stay fresh for up to three days without refrigeration.
- Category: Bread
- Method: Bread machine
Keywords: gluten free, bread, dairy free


